
Using Digital Oral Reading Records Reports
Teachers can use interactive reports to track reading level progress over time, calculate their students’ fluency rate trends, as well as use other great features to personalize their teaching style and facilitate student growth.
View Summary Reports
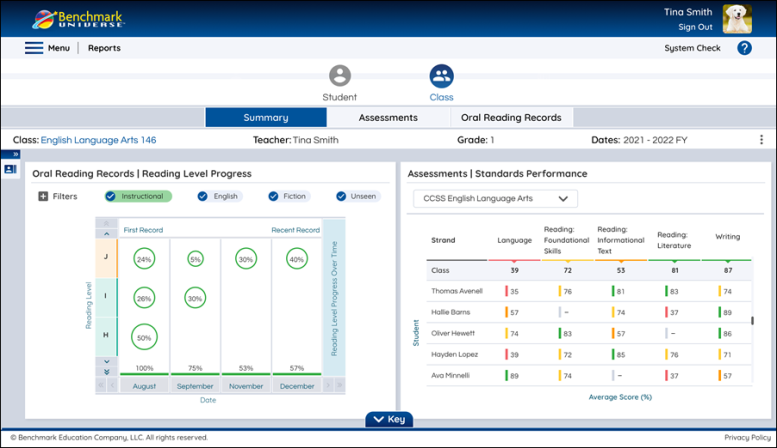
Teachers will see a slimmed down version of the Reading Level Progress report of one of their classes as soon as they enter Digital ORR Reports. Teachers can select which class data they want to view by using the Universal Selector to the left.
Select Data using the Universal Selector
The Universal Selector allows teachers and administrators to select the test data they want included in the report they’re viewing and at what level. Using the Roster tab, teachers can easily move from focusing on a single student’s performance to seeing how multiple students or an entire class performed. The Date tab lets you filter student test results by custom or preset date ranges.

|
Administrators can choose between schools. Teachers have their school pre-selected for them. |
Use the Roster Tab’s Data Filters
Begin by adjusting your report data from the Roster tab using the dropdown menus.
You can filter test data by class and student
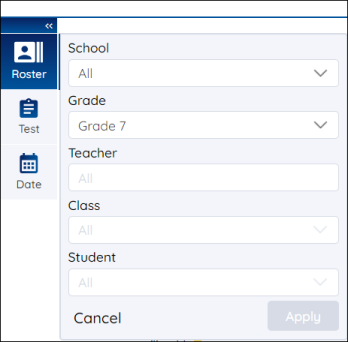
- Access Reports.
- Click the Roster tab on the Universal Selector.
- Select a school (if you have access to view multiple schools) from the School dropdown box. You can also enter the school name into the search bar.
- Select a teacher (if you have access to view multiple teachers) from the Teacher dropdown box or enter the teacher’s name into the search bar.
- Select a class from the Class dropdown box or enter the class name into the search bar.
- Select a student from the Student dropdown box. The default is “All”. Locate a student by typing their name into the search bar, or by using the buttons and sorting arrows below the student list. After you've located the student, click the student's name.
- Click Apply.
|
|
The options displayed in the Universal Selector come from data derived from your student roster. Students can appear in the student drop-down box even when they have no associated assessment data. Including them in your report does not impact the displayed metrics |
Filter Data by District Term Dates and Common Date Ranges
You can filter test data by their district terms and common date ranges by using the Date Tab.
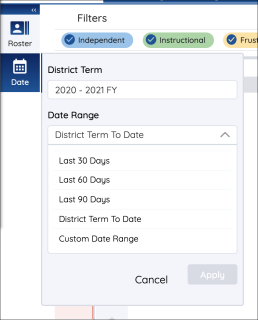
- Click the Date icon on the Universal Selector.
- Select a district term on the District Term drop-down menu.
- Select a date range from the Date Range drop-down menu. Date ranges include the Last 90 Days, District Term to Date, and others.
- Click Apply.
Filter Data by Custom Date Range
You can filter test data by their district terms and custom date ranges by using the Date Tab.
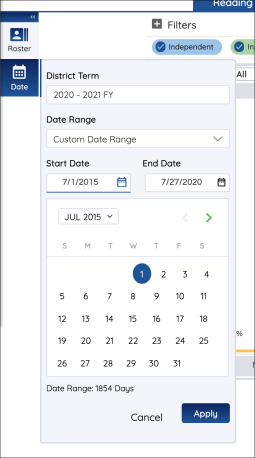
- Click the Date icon on the Universal Selector.
- Select a district term on the District Term drop-down menu.
- Select Custom Date Range from the Date Range drop-down menu.
- Use the drop-down month selector or arrow buttons in the Start Date drop-down menu to select the desired month and day. Select the desired date in the End Date drop-down menu.
- Click Apply.
|
|
Date ranges cannot exceed the span of a single district term. |
Using the Record Filters
Select the + Filters button to expand the filter options.
.jpeg)
You can select or deselect certain options to change which data appears in the graphs below. Select Apply to set the filters.
If there are no assignments that match a particular filter combination, you will see a message displaying, “No Data Available”.
To learn more about viewing student or class reports in Digital Oral Reading Records Reports please go to View Student Reports in Digital Oral Reading Records Reports or View Class Reports in Digital Oral Reading Records Reports.
Last Updated: March 12, 2024